Thursday, November 29, 2012

Altered Book Art Journal

I've seen some REALLY cool art journals made from altering & re-purposing an old book. The problem is all the tutorials I've seen have called for gesso... Which I don't have & since my current art supply budget is about $2 a month >.>  I had to think of a way to improvise...

For my poor man's altered book journal I used:
* cheapest Apple Barrel acrylic paints
* masking tape
* watercolours
* ink pads
* discard book from library

I got a $1 hardcover book from the library's used book store They sell discard books & books that people have donated... I love books so it took me about an hour to find one that was a) the right size/shape b) sturdy enough and c) one I wouldn't feel guilty about ripping up & painting on o.O  lol I spent a lot of time in the diet & "politics" sections..

altered book

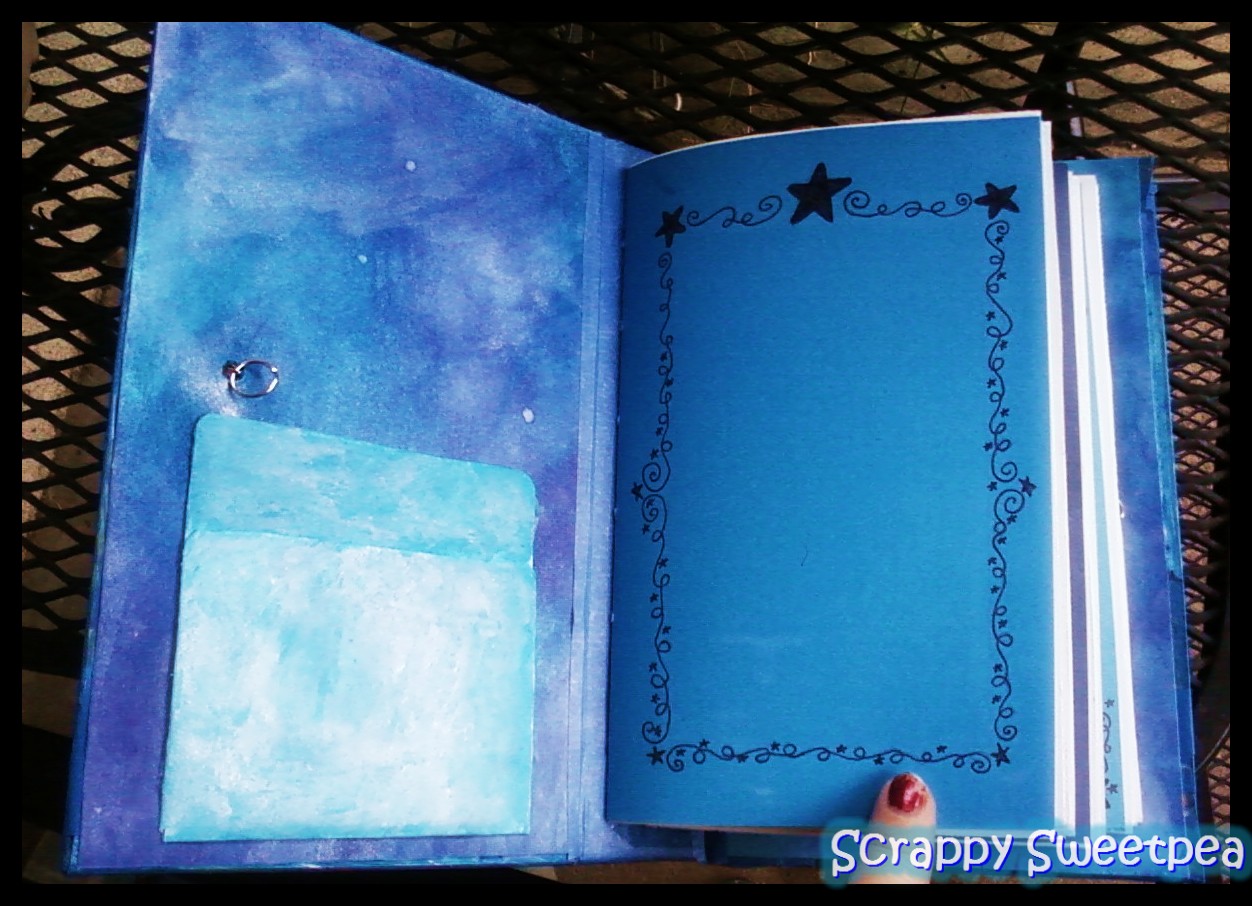
This is what the book looked like after it was reincarnated into my journal :)
The book was originally a dull blue so I used  some blue acrylic & shimmery watercolours to brighten it up

When I was putting my name on it, I accidentally put it on the back cover so now the text on the inside pages is upside down. But actually, I like it because now the text in the background of the pages look more abstract. :)

I ripped out about 1/3 of the pages & then went thru & taped the remaining ones together with masking tape in groups of 3 to make thicker pages. I also put masking tape in the center of most spreads to help prevent pages from falling out & keep paint from seeping into the middle. 

I only had three colours of acrylic paint (pink, blue & white) so I experimented a bit combining them with watercolours since I have more of those.

watercolour over white acrylic + bubble wrap texturing

I really like the effect of watercolours over dry white acrylic. It's kind of dreamy

watercolour over white acrylic 

watercolour over white acylic


watercolour over white acrylic, inked edges & stamp
 Look at the  difference between the orange over the acrylic covered page & over the naked masking tape in the middle! This is one of my favourite pages :)


watercolors over acrylic... giant bubble wrap!

white acrylic, watercolours, ink pad & spider stamp!

Painting over the white acrylic obviously makes the colours much lighter.. so on the left side of this spread I left some space free of the acrylic. It came out nice & black.. but it seeped thru all three pages :{  That didn't happen on pages that were completely covered w/ the acrylic paint so I think if I want really black pages, I will need to find some black acrylic. I used a black ink pad to make the edgers darker.


Another attempt to try & get a darker background.. this time I used the blue acrylic as the base & built up layers of black watercolour over it.

The top right corner is scotch tape which I coloured w/ permanent marker & then partially scrapped off. 


acrylic, inked bubble wrap, magazine image & stickers

This is my other favourite page. I had been saving this image from an issue of Gothic Beauty, and when I mixed this dusty purple colour it just seemed to work perfectly with it. I added some red heart stickers to tie in with her outfit.


I also added graph paper to several pages.. I taped 'em in with masking tape so I could paint over the edges & blend them in with the background.

pink & white acrylic, masking tape & graph paper


I am TRYING to leave some of the pages bare for  ideas I might have when I'm actually using the journal... but it's hard to resist the blank pages!


Saturday, November 24, 2012

Building a Stash: Part 1

I think most artsy-crafty types have a "stash" of stuff that they've bought. You see something cute when you're at Michaels or skipping thru the office supply aisle at Target >.> ....
& you snatch it up and take it home to squirrel away.

As much as I love pretty coordinated paper lines & stickers and all that, I've found myself wanting to use less store bought things on my pages. I want there to be more of ME & less mass produced elements that are on thousands of other peoples pages.

Of course it's usually quicker & easier to grab pre-made elements from your stash. So I've been working on building a stash of my OWN creations. That way, even when I don't have time to make something myself right then, I can still have my own work on the page :)


Stickers

I LOVE making stickers! Whenever I make some for my etsy shop, I try to make a few extra for my own use.


These are some stickers I made for my journal calender. I use a lot of   "diary deco" stickers on my calenders (especially My Little Friend by Pony Brown) but wanted to make some that are more Anne-specific lol


Some emoticon-type stickers I made after searching for similar ones that were NOT just happy faces!

Ideas & Resources:
Avery label stickers are pretty easy to find anywhere that has office supplies and are great to doodle on.

There's also a lot of sellers on Etsy which sell cute blank stickers:


Journalling Cards


I LOVE journalling cards!! (Can you tell?)

And they are not hard to make yourself. In fact, if you look at a lot of the commercially made ones- the design is pretty simple.  I have  several different ways that I like to make journalling cards (which I hope to share with you soon) however in the meantime there are lots of tutorials out there by creative crafters!

Ideas & Resources:


Patterned Paper 


Making my own patterened/background paper is something I tend to do when I feel like being artsy- but don't really have any focused ideas... I just start randomly doodling & flinging paint around. It's also one of my stress reducers!

lots & lots of layers!
watercolours over flowers doodled in permanent marker


Ideas & Resources:
  • If you (like me!) prefer kind of crazy, layers-of-paint type backgrounds, check out the tutorial over at Peony & Parakeet (I love her papers!)
  • If you like more neat & simple backgrounds (nothing wrong with that!) check out this one by Dawn McVey


Photos


I have a folder called "Random Photos I Took" on my computer.  There are a lot of shots of the sky &  flowers & trees... and people's shoes (cuz I'm weird like that!).  I've been steadily going thru & ordering prints of them.  There's a lot of "found images" used in art journaling- which cool but I think there's something to be said for using your own photos.
 
When I had access to a printer, I used to print my photos on regular printing paper- which is ideal if you like to write & doodle on them!


But now I usually order collage prints which I then cut up so I have lots of nice little pics ready to go.  I reused the clear plastic envelope from a sheet of stickers to store mine.


Ideas & Resources


Saturday, November 17, 2012

Quotable Quotes


I was watching "Harriet the Spy" the other day & totally understood her panic when they took her notebook away. If you're a notebook keeper- that's how you record & process things that happen,  how you sort out your thoughts & let out your feelings, so to have it taken away?? o.O *shudders*

Sunday, November 11, 2012

Art Journaling: My Way

I would love to do "proper" art journaling with lots of layers of paint & ink & collage elements... The problem is- my paper can't take it!

Now, I do have a fair amount of paper stashed away. But I didn't start playing with paints or wet media until this year so most of my paper is colourful notebook paper (which I LOVE!) and cheap scrapbook paper.  This type of paper buckles badly & will pretty much disintegrate with too much paint. I don't have the funds for gesso or anything to treat my paper so I have taken to doing this:

  
mini art journaling "pages"


 I do my little art journal "pages" on small scraps of paper or blank ATCs & glue them into my book.

This eliminates a lot of barriers for me.

1) It doesn't matter if the paper buckles or the paint seeps thru- because it's just going to be glued down anyway!

2) I use less paint & ink, which means I don't use up my supplies too quickly

3) My notebooks don't get filled up faster than I want (I generally like my journals to last me 6 months- 1 year)

3) I've found that I prefer to make smaller paintings & drawings rather than larger ones.  It keeps me from getting overly fussy about details & making it perfect. Full page spreads for every idea would be too much.

4) I can work on my journal even when I don't have it with me

Prepped backgrounds


I have a bunch of pre-cut cards that are stashed in my journal pocket, purse, wallet & a couple other convenient places. Most of them are blank but I do sometimes prep the background ahead of time, like the ones above. I also use scraps or scratch paper & cut them down later.

Anyway, I just wanted to throw this out there into cyber space.  Maybe somebody else will find it helpful :)


Saturday, November 3, 2012

And I Start to Complain When There's No Rain

"Oh but EVERYBODY loves sunshine!"

Sorry, no... some of us are odd little Bee Girls who just wish it would rain already..

Seriously sunny days are usually miserable for me. But there seems to be a lot of things that "EVERYBODY" loves, except me.

If you don't get the reference in the title, you should really google the video for "No Rain" by Blind Melon. The little Bee Girl is representative of all us oddballs who dance to a different beat ;)


Thursday, November 1, 2012

Starry Night Notebook


Ta-da! Another notebook! lol isn't it prettiful? :D


It's another one that is made out of a Hamburger Helper box (I just think they have good dimensions for books!). However, instead of covering this one with paper, I just painted the box itself.


The outside cover is painted with blue acrylic & then Yasutomo shimmery watercolours over it.

(The Yasutomo watercolours were sent to me by a wonderful Crafty Fairy Godmother! )

The closure is made from salvaged bits of chain from broken necklaces fed thru an eyelet. 


jump ring to act as a stopper
I got this idea for the closure from one of Kathy Orta's videos.

inside front cover
On the inside covers, I used leftover paper scraps (from making the pages) which I painted with Crayola watercolours with a bit of the shimmery Yasutomos over them. I used something like 5 shades of blue but the effect is very pretty!


I made a little library card style pocket out of some leftover cardstock (lots of recycling going on in this notebook!)

back inside cover... soo sparkly! O.O
 
side view


There are 3 signatures that are stitched into the the book. The outside of each signature is blue cardstock with white, mixed-media paper in the middles.


I drew little shimmery star designs on the first page of each signature.

I'm really happy with how this one came out (no pages stitched in upside down!!! First time ever!)

I think I am probably going put it up for sale in my Etsy shop... since I am rich in notebooks, but poor in cash.  Altho, if nobody ends up buying it, I'm sure I can find some use for it ;) hehe